

Hi Folks! In this post I will show you how to install and configure Jenkins with SVN to build and deploy your application (so every time you change your code in SVN, the application gets deployed automatically). Jenkins will integrate with your SVN repository, downloading the source-code and then building the application, restoring any Nuget packages your application might have installed. Only then a task to deploy everything will be called and the process will be done. This tutorial works best if you install Jenkins on the same server that hosts your applications (IIS).
Before you start, check out the list of software involved in this tutorial:
- [Pre-installed] Java Runtime Environment, version 11 (click here to know how to install it);
- [Pre-installed] Subversion, version 1.14.2 (r1899510);
- [Pre-installed] VisualSVN Server, version 5.0.2 (click here to know how to install it);
- Jenkins, version 2.346.1;
- Visual Studio 2022 Community Edition (it's nice to have pre-installed in your server, because we need to configure Nuget - you can uninstall it afterwards);
- Visual Studio Build Tools 2022;
- [Pre-installed] Microsoft Windows Server 2022 Standard, version 10.0.20348 Build 20348.
Here's the recommended hardware configuration for a small team to run Jenkins:
- 4 GB+ of RAM
- 50 GB+ of drive space
Creating the Jenkins User
First, let's create the Jenkins user (we won't be using the Local System one, it's not recommended by it):
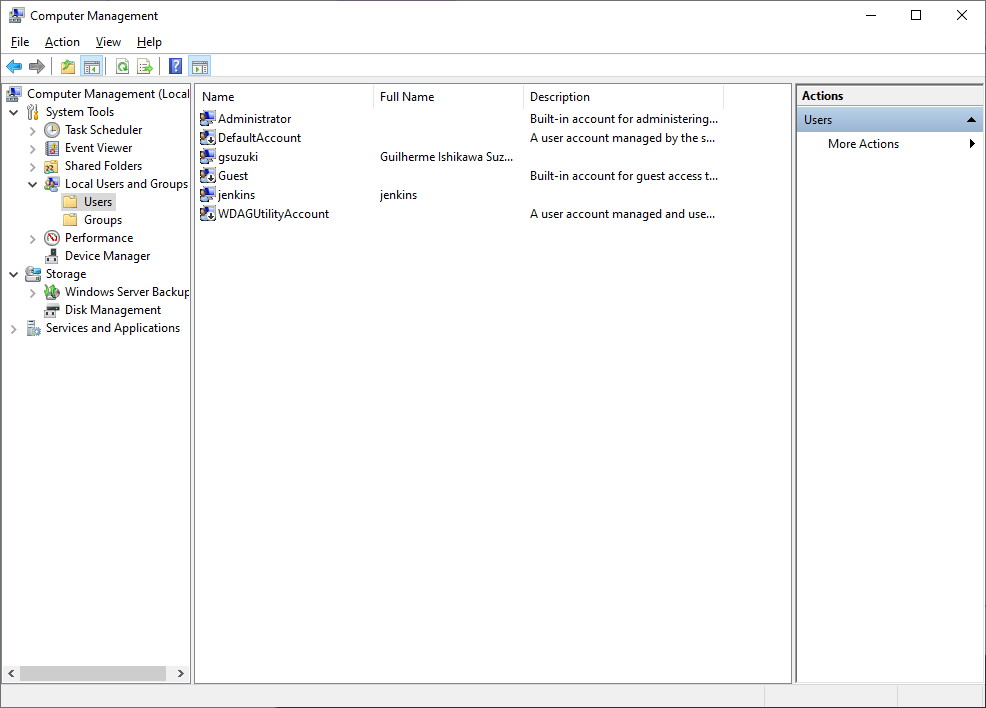
Click on the Windows Button on your Taskbar, type in "Computer Management" and then enter. The screen above will be opened.
Then expand the "Local Users and Groups" menu of the left frame. Click on "Users" next.
In the middle frame there, right-click and then select "New User...". The following screen will be opened.
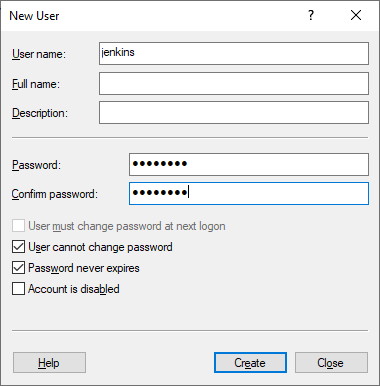
Type in "jenkins" as the User name, choose a strong password (you can generate one at https://www.gsuzuki.net/devtools/passwordgenerator). Make sure "User cannot change password" and "password never expires" options are selected. Click "Create" in the end. Done! Your user is created. And store the password somewhere safe (we are gonna need it when installing Jenkins).
Allowing the jenkins user to logon as a Service Account
We need to setup the newly created account to allow logon as a service account:
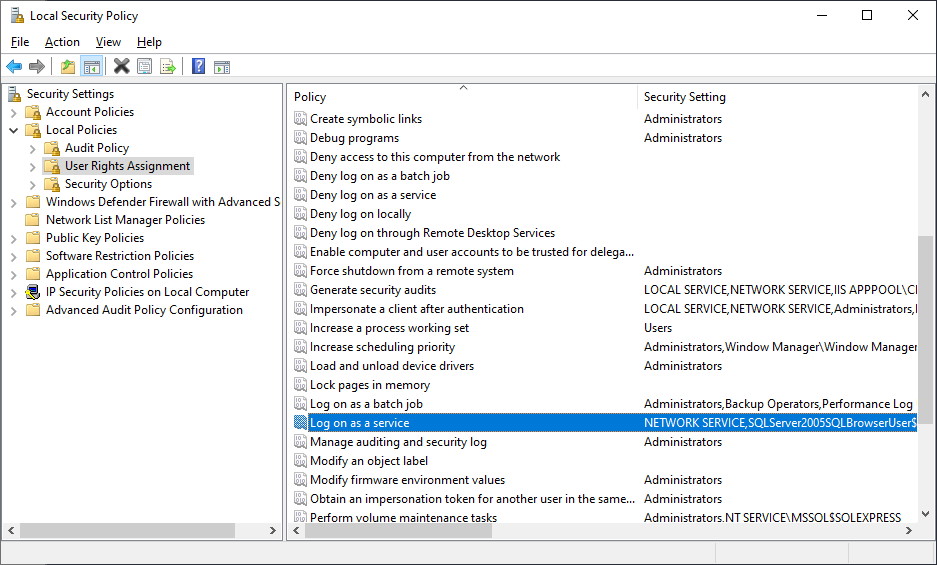
Click on the Windows Button on your Taskbar, type in "Local Security Policy" and then enter. The screen above will be opened.
Then expand "Local Policies" in the left frame and select "User Rights Assignment". Look for an option called "Log on as a service" in the right frame and double-click on it. The following screen will be opened.
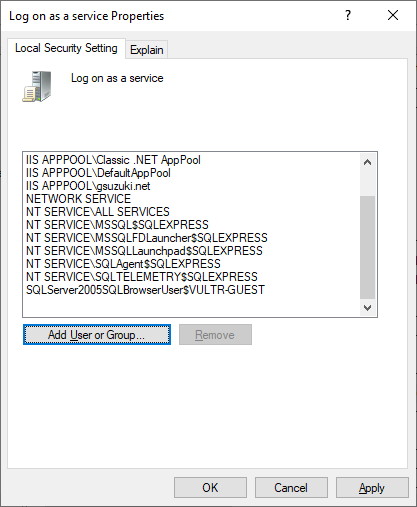
Click on the "Add User or Group" button. Another window will be opened. Type in "jenkins" on the "Enter the object names to select", then click on the "Check Names" button (the jenkins user should be underlined and fully qualified, like the server name\jenkins).
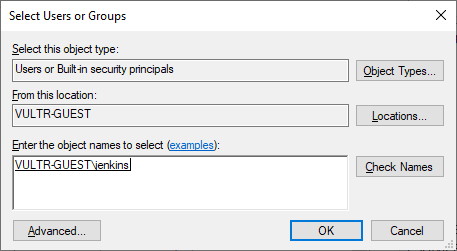
Click "OK" to add the user and then "OK" again to link the jenkins user to logon as a service.
Setting up folder permissions for the jenkins user
We need to setup permissions in two folders: one for the repository that will be used by Jenkins to download the source-code and another for the folder where the applications are running (IIS folder). I recommend using "C:\Projects" for the first one and "C:\Sites" for the second one (don't forget to allow full-control for a user called IIS_IUSRS).
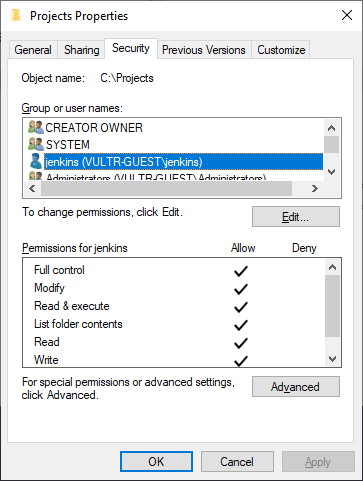
Open the Windows Explorer and create a folder in C:\ called Projects. Then right-click on it and select Properties. Go to the Security tab and click on Edit. In the Permissions for Project screen you should add the jenkins user and allow full-control on the directory. The result should look like the screen above.
Repeat the same steps for the Sites folder (you will have to allow full-control for the IIS user). You will also have to setup the applications to point for the new Sites folder (it's a complete different step).
Installing Build Tools for Visual Studio 2022
Go to https://aka.ms/vs/17/release/vs_BuildTools.exe and download the exe installer. Open the file to start the installation process:
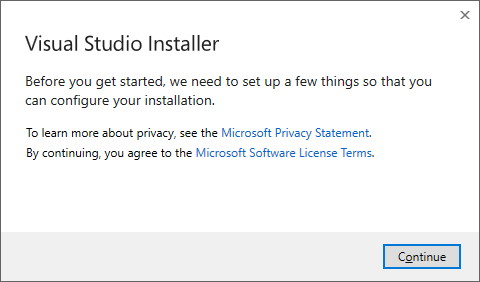
Click "Continue" to start the download process of the installation.
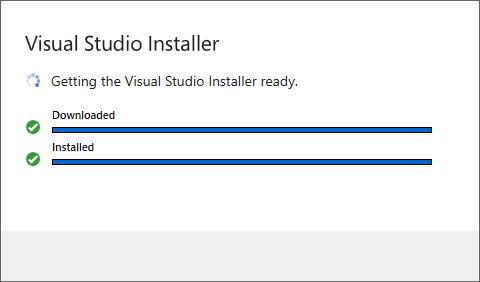
The installer will download the files and proceed to the next screen.
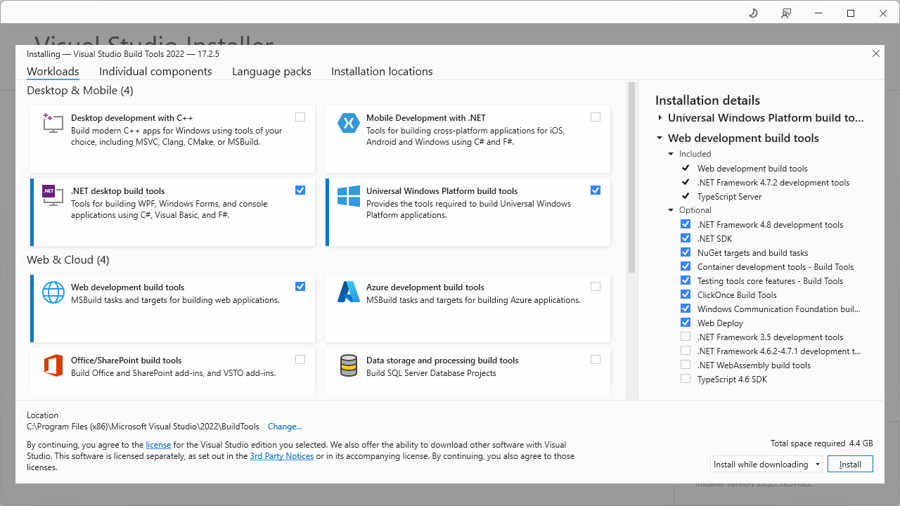
Make sure you select ".NET desktop build tools", "Universal Windows Platform build tools" and "Web development build tools". Then click on "Install". Wait for the process to go through and done! You installed the Build Tools for Visual Studio 2022.
Installing Jenkins
Go to https://www.jenkins.io/download/thank-you-downloading-windows-installer-stable/ and download the msi jenkins installer. Open the file to start the installation process:

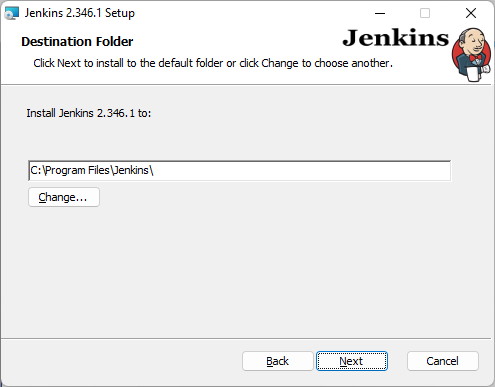
Click "Next" to input an installation folder.
Click "Next" to proceed to the Service Logon Credentials.

Select "Run service as local or domain user:" and then type in "jenkins" and the password you choose. Click "Test Credentials" and then "Next".
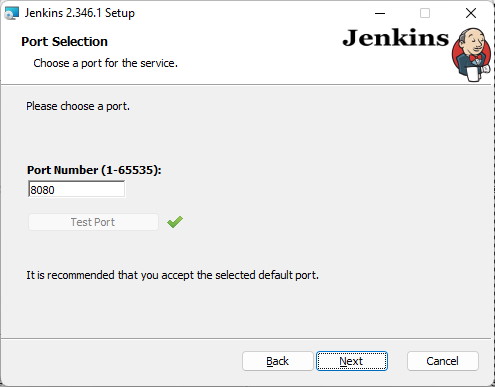
Click on "Test Port" and then "Next".
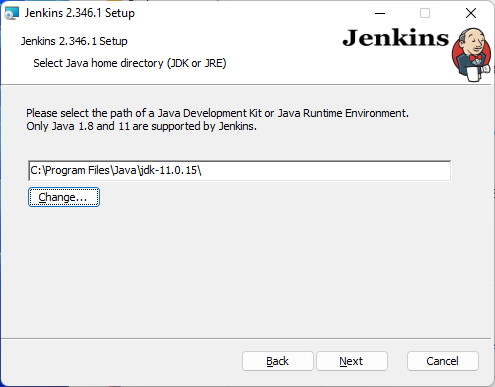
Now if you have installed the Java Development Kit 11, you should be able to select the right path.
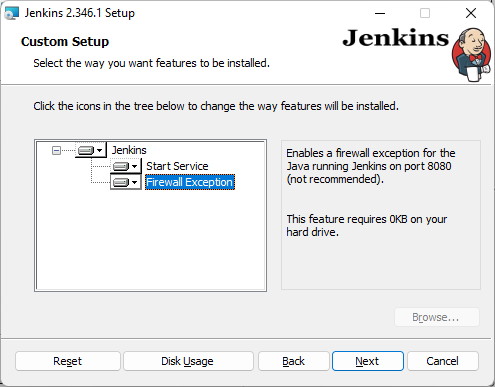
For this step, you can mark "Firewall Exception" as a feature to be installed (so you will be able to access Jenkins dashboard from outside the server).
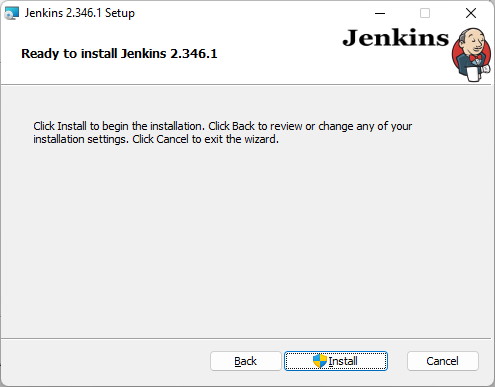
Click "Install" to finally start the installation process.
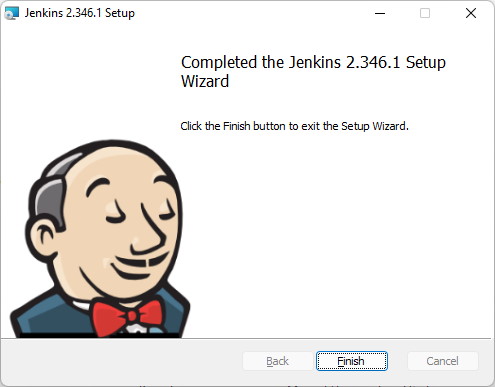
Click "Finish" and you will be done with the Jenkins Installation.
Troubleshooting :: Jenkins failed to start - Verify that you have sufficient privileges to start system services
If you are having issues with the step of running the Jenkins service in the installation, please refer to this stack overflow guide here.
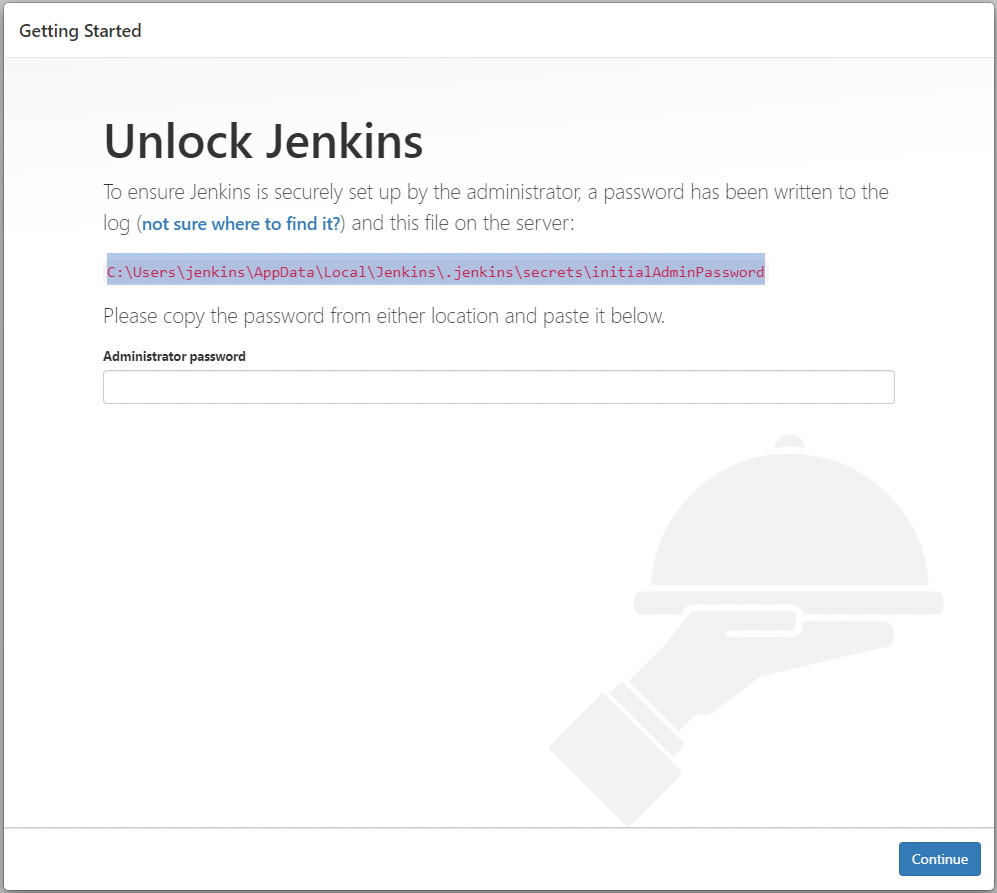
Accessing Jenkins with the admin user for the first time
Right after installing Jenkins, you will have to access the admin account to start the setting up process. The password is randomly generated and is available in the C:\Users\jenkins\AppData\Local\Jenkins\.jenkins\secrets\initialAdminPassword file. You will need to browser the location folder by folder (if you don't have administrator privileges). Open the file then copy the password and paste it in "Administrator password".
Installing and configuring the required plugins in Jenkins
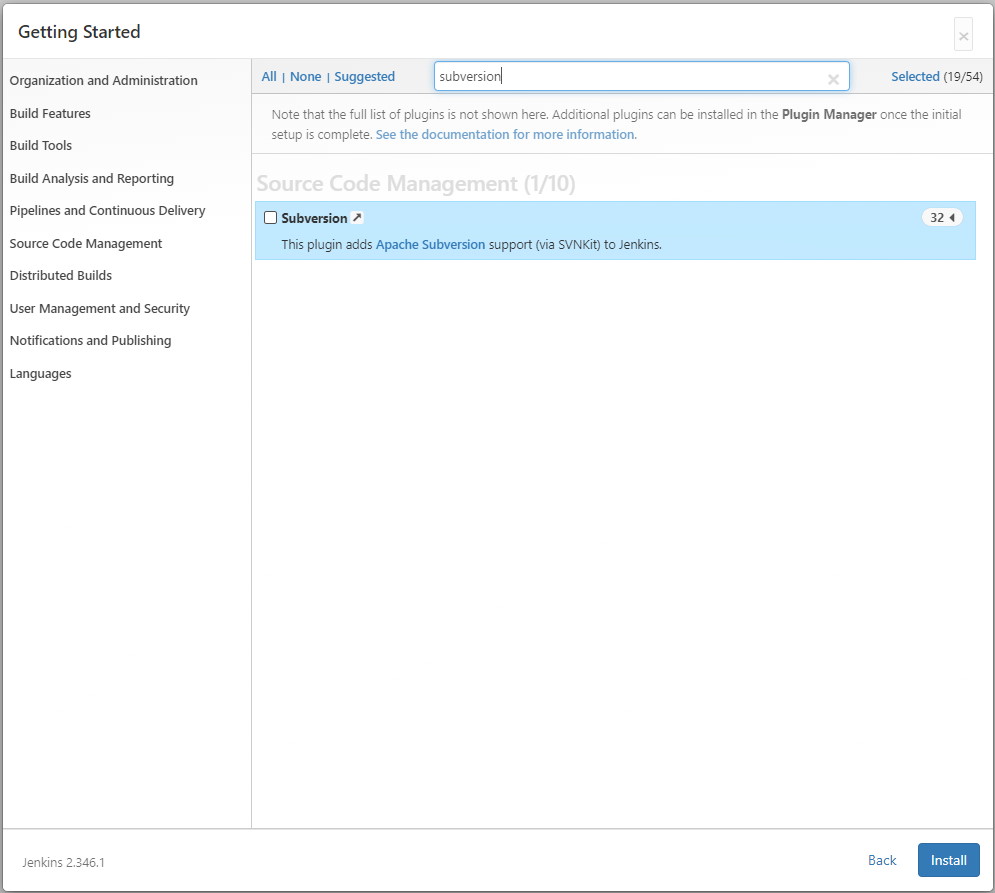
We will need to install 3 plugins on Jenkins to make the build and deploy work: Subversion, Nuget and MSBuild. Click on "Select plugins to install" and type in Subversion.
Jenkins will check for dependencies on the plugin and then proceed with the installation.
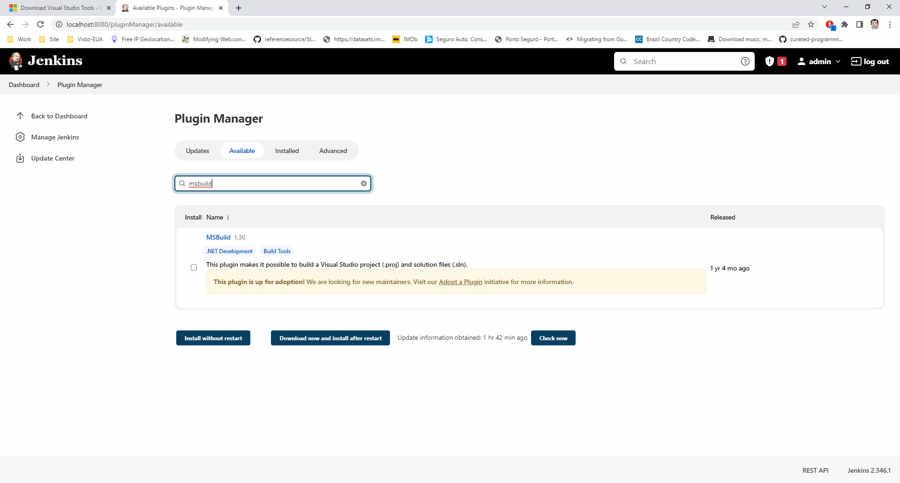
For whatever reason, you will need to access from the dashboard home "Manage Jenkins" and then "Manage Plugins" again. Then click on the "Available" tab to install the MSBuild plugin. Type in MSBuild in the search box and then enter. You should see an entry for MSBuild just like the following screen.
Select the plugin and then click on "Install without restart".
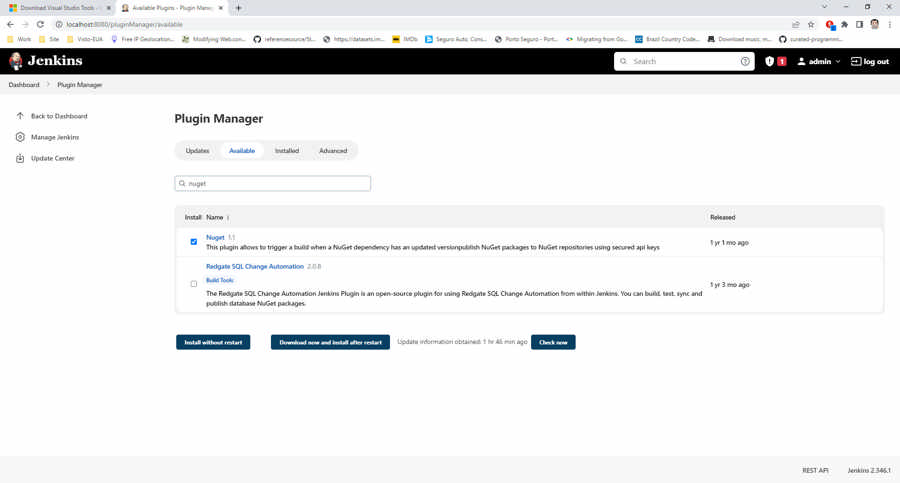
Next plugin is Nuget. Repeat the same steps above, but with typing in "Nuget" for the available plugins. Select it and then go to "Install without restart".
Configuring the MSBuild plugin in Jenkins
Go the Dashboard, click on "Manage Jenkins" and then on "Global Tool Configuration". Scroll down to the MSBuild section (see following screen for reference).
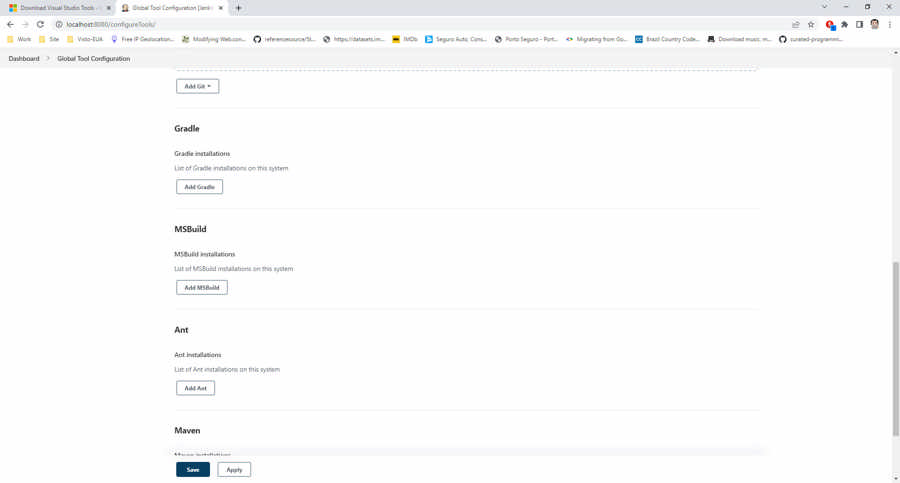
Click on "Add MSBuild". Fill the screen in with "MSBuild (VS2022)" as the name (required), "C:\Program Files (x86)\Microsoft Visual Studio\2022\BuildTools\MSBuild\Current\Bin\" in the Path to MSBuild and "/p:WarningLevel=0 /p:VisualStudioVersion=17.0" as the Default parameters. Just make sure the path for the executable exists. Finally, click on "Save".
Adding the SVN username and password in the Credentials
To being able to connect on your SVN server, we need to add credentials in Jenkins. Click on "Manage Jenkins" and then on "Manage Credentials". The following screen will be presented to you:

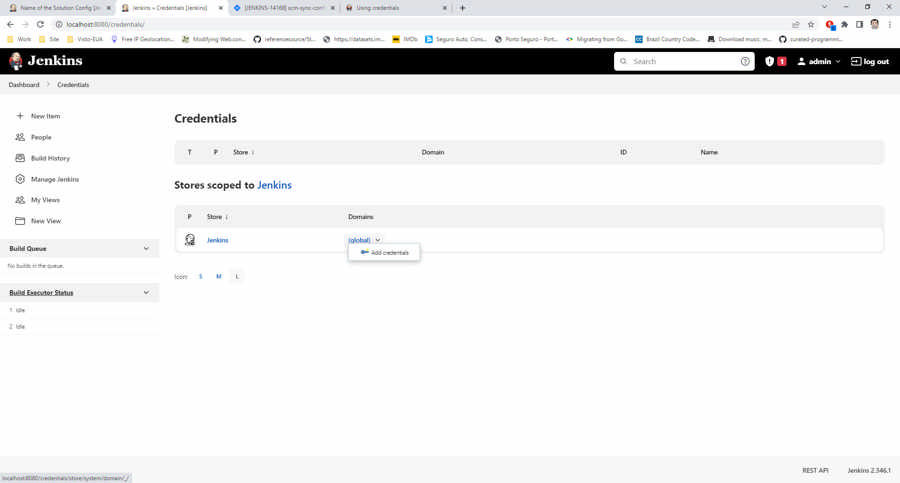
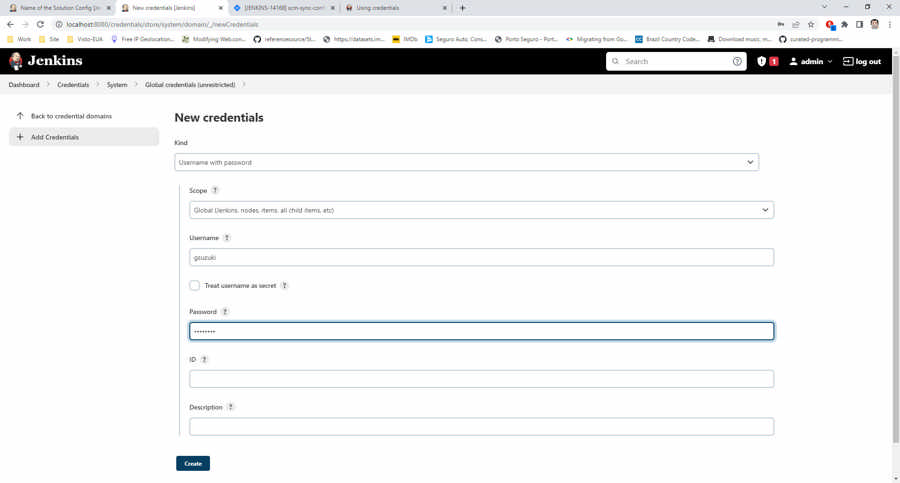
You then click on "Global" and "Add credentials". The third screen above will open: type in the SVN username and password. Then click on "Create".
Configuring Jenkins to Build your Solution (and restore any Nuget packages along the way)
Go to the Dashboard once again and click on "New Item" in the left frame. Type in a name for the item and then select Freestyle project (see screen for reference).
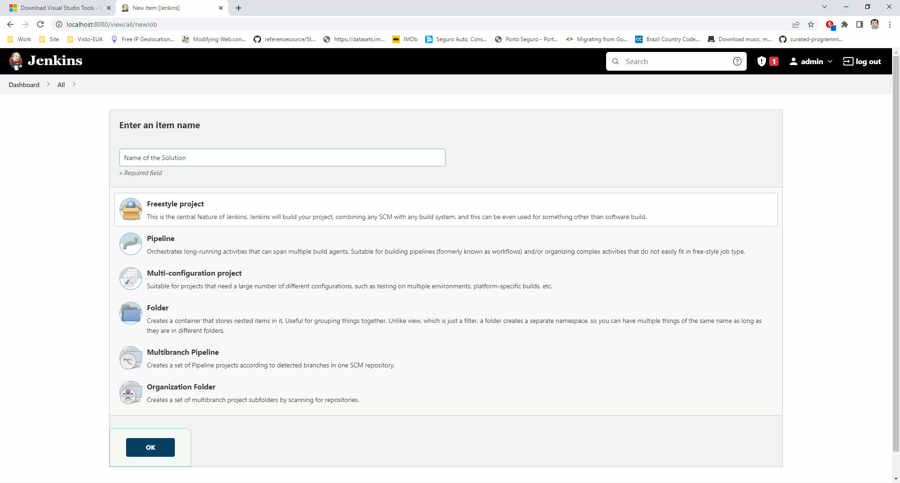
Click "OK" to proceed. A new screen will be shown. Start by clicking on "Advanced..." and then on "Use custom workspace". Make sure to type in "C:\Projects\[Name of your Solution]" as the directory.
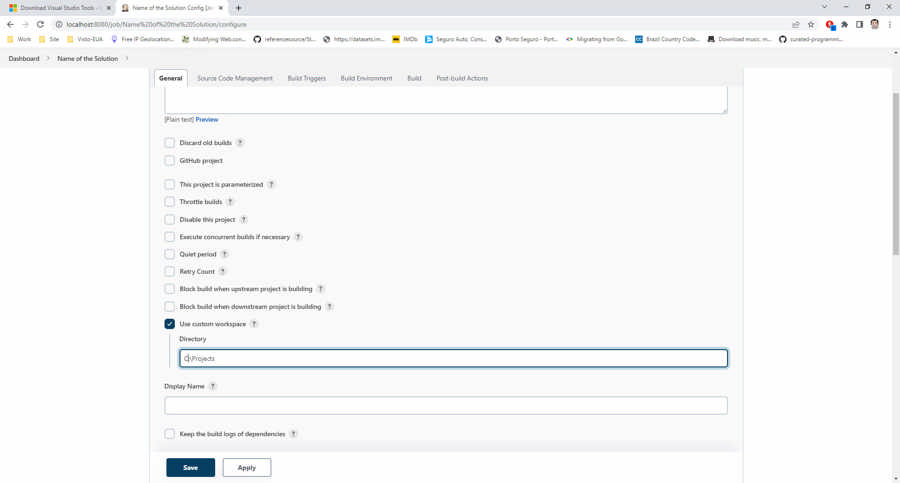
This is the directory where Jenkins will download the source-code of your solution.
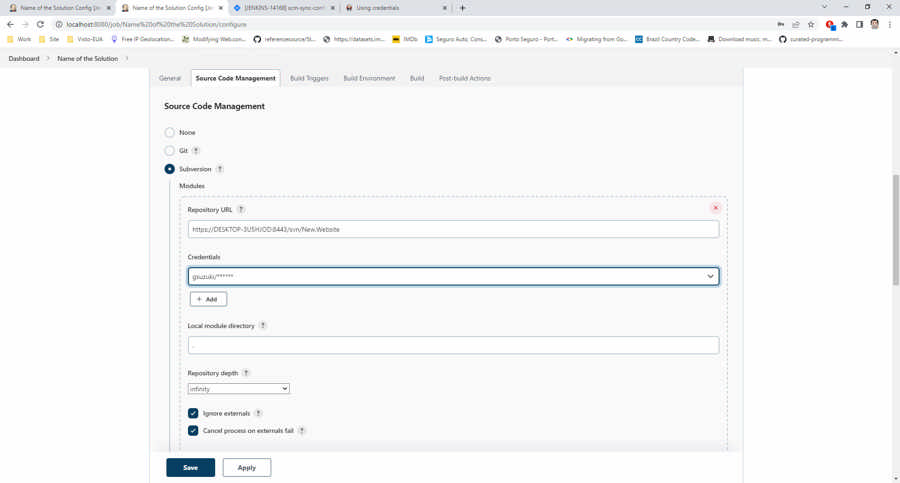
In "Source Code Management", make sure you select the "Subversion" option. Enter the Repository URL. Then select the created credential.
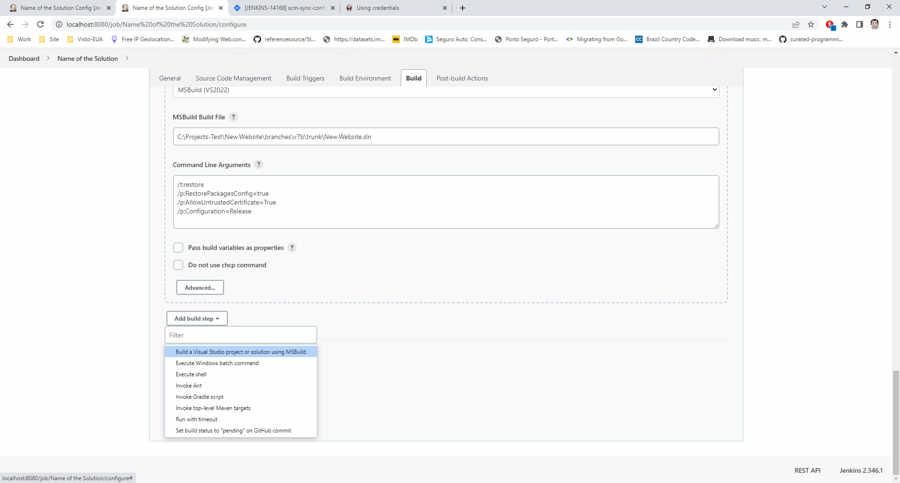
Go to the Build tab, click on "Add build step" and then on "Build a Visual Studio project or solution using MSBuild".
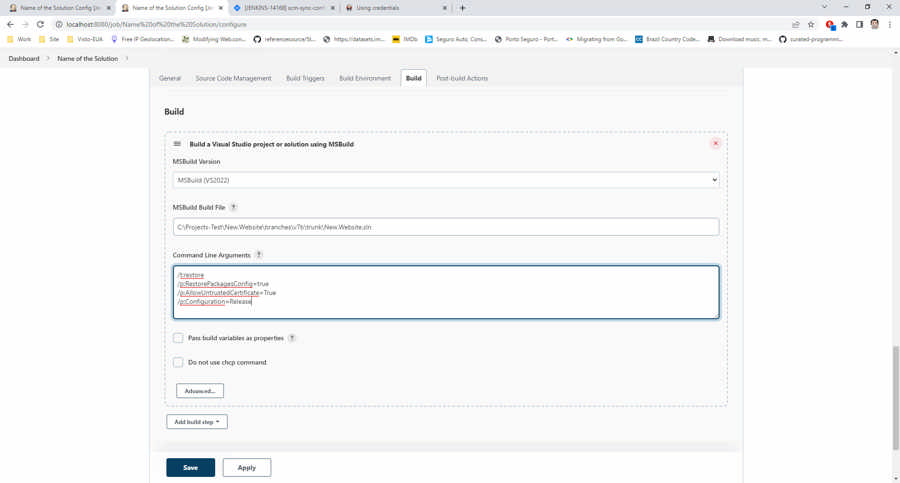
Select the MSBuild (VS2022) in the MSBuild Version, type in the solution path for the MSBuild Build File and then add the following Command Line Arguments:
- /t:restore
- /p:RestorePackagesConfig=true
- /p:AllowUntrustedCertificate=True
- /p:Configuration=Release
Click "Save" and then test the build by clicking on "Build Now". In the Build History section of the screen, a green indicator should be listed.
Creating a publish profile for the target project in Visual Studio
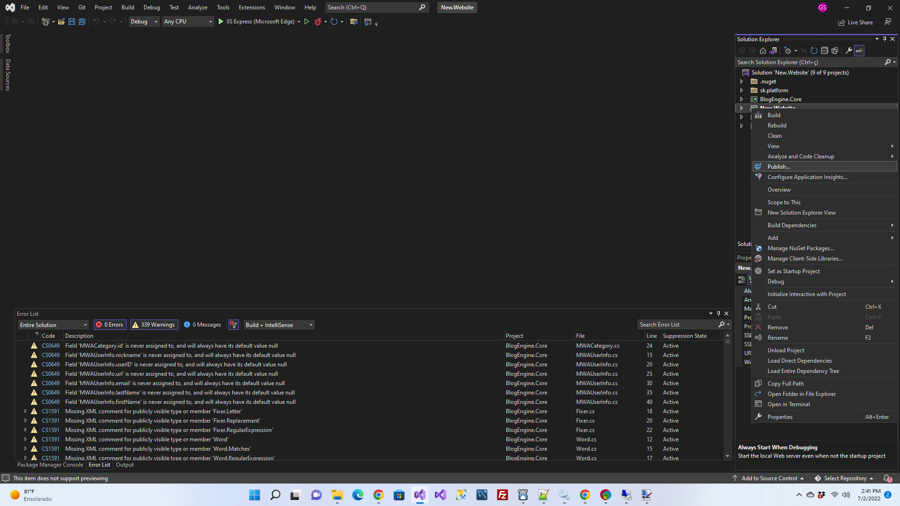
Open your solution in Visual Studio. Right-click on the project you would like to deploy and then click on "Publish".
Click on "+ New" and then select "Folder".
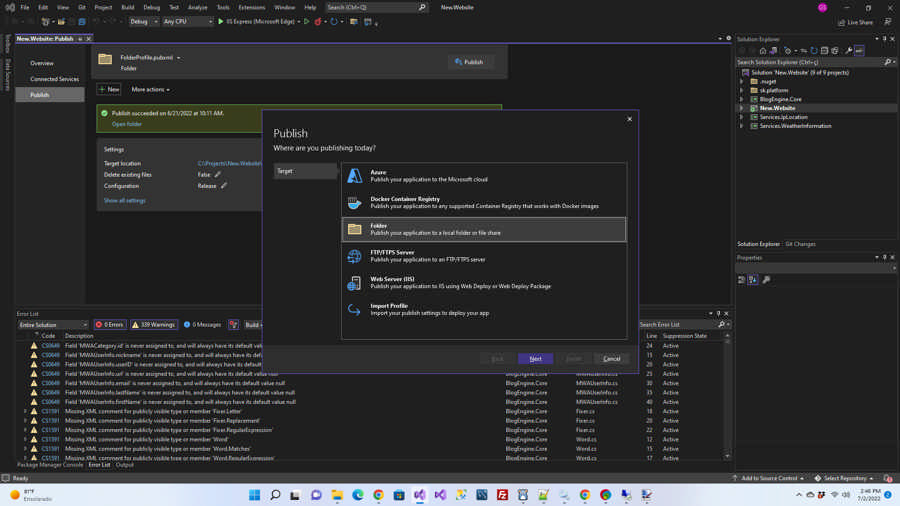
Click "Next".
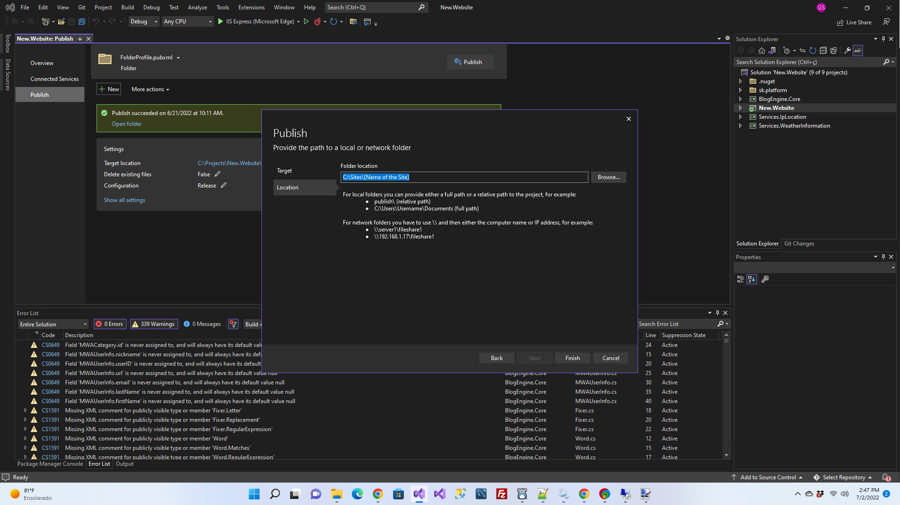
Type in the Folder location (it must be something like C:\Sites\[Name of the Site]) and then click "Finish".
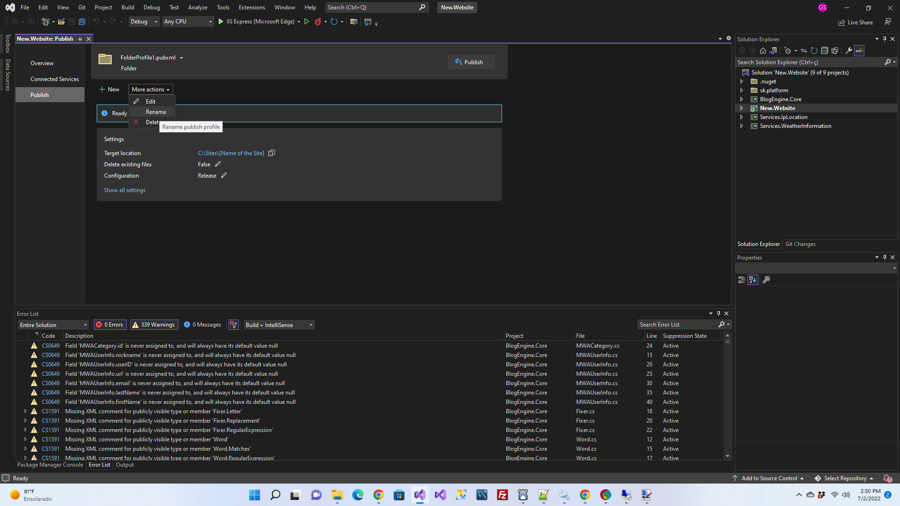
With the newly created Folder Profile Publish screen opened, click on "More actions" and then "Rename". Type in "Local-IIS-Folder" and then Rename.
Configuring Jenkins to Deploy your project
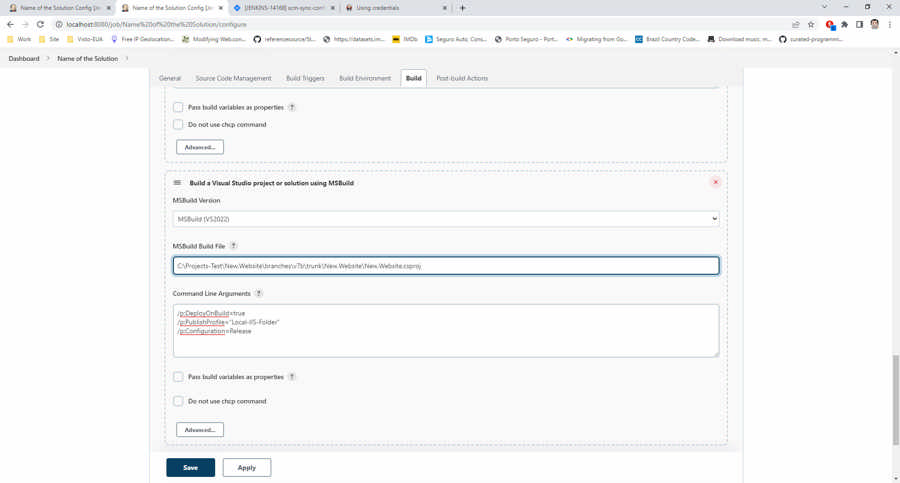
Go back to the Dashboard in Jenkins. Click on the name of project you created and then on Configure (left frame in the page). Scroll down to Build and then click on "Add build step". Select "Build a Visual Studio project or solution using MSBuild".
Select "MSBuild (VS2022)" as the MSBuild Version, type in the location of the csproj from the website you would like to deploy and then add 3 Command Line Arguments:
- /p:DeployOnBuild=true
- /p:PublishProfile="Local-IIS-Folder"
- /p:Configuration=Release
Click "Save" and Build your Application once again. Everything should work smoothly (green indicator for the build).

