

Hi Folks! This is the final step on creating a gaming virtual machine for your PC, using your GPU attached to it. If you are reading this without knowing the hardware requirements to do so, please refer to this link (where I talk about Intel VT-d). Open a terminal window and create a directory called VMs in your home.
$ mkdir /home/<your username, not root>/VMs
Now, we will create the file that will hold the virtual machine's files, using the following command:
$ qemu-img create -f qcow2 \
/home/<your username, not root>/VMs/win10.img 128G
Note that we should execute the commands above not in the root context, but rather in our default users.
I decided to go with the qcow2 format, because the files won't occupy its predefined size right from the beginning, it will expand as the virtual machine uses the space. Feel free to choose another size, more than 128GB.
Just make sure you don't create an image too small, especially for gaming. I would recommend 256GB minimum. And it's very hard to expand the capacity of an image file, so take your time before you create one and start installing windows.
Download Windows 10 from the Official Website
Go to Microsoft's website and download the latest version, even if you already have it stored. The latest ones contain updates that are really useful for a virtualization method such as this, improving the overall performance of the virtual machine. I once tried to update an older 15XX version via windows upgrade, but it wouldn't go all the way, so I had to create a fresh new one.
It's show time!
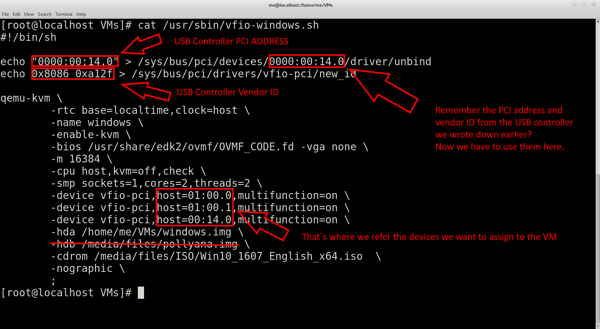
Ok, all set! Now, We will create the shell script to boot the virtual machine, holding every definition of it. Remember the PCI addresses and vendor IDs from the devices we checked up earlier? We will use them now. Take a look at the script I have first.
download the script here: vfio-windows.sh (775.00 bytes)
The first 2 echo commands will unbind the USB controller from its current driver and then reassign it to the vfio-pci kernel module. Even though we prepared the USB controller to be also used for virtualization from the very beginning, devices like that are treated differently. It makes sense though, because USB devices like keyboards and mice need to be used as input early on.
The tricky part here is that we need to use the full address notation, meaning we have to add "0000:" in front of it. And we have to prefix the vendor ID in the second echo command, so in my case the vendor ID is 8086 a12f and it should look like this echo 0x8086 0xa12f...
For the next step, let's take a look at the 3 -device parameters part of the command. You have to replace them with the PCI addresses you found from the lspci command in the part 2 of this tutorial. If you are sharing the GPU installed at the first PCIe slot, the first 2 PCI addresses should be the same: 01:00.0 and 01:00.1. The third one is the address from the USB controller to use the ports directly in the VM.
Then, replace the path shown on the -hda parameter to the image filepath you created earlier and the path shown at the -cdrom parameter for the windows 10 ISO file downloaded before.
If you are using the provided file, the virtual machine is set to use 8192 MB for RAM (the -m parameter).
Save the file and close vi. Before running the script, we have to make it executable by changing the file attributes. Run the following command: chmod a+x <file name>.
In a terminal window, escalate your permissions to root and run the script.
The installation process is pretty straight forward and you should be able to use the virtual machine like a normal PC. It will display a low resolution until windows finds the proper driver online.
Next you have the troubleshooting section, if having issues.
Optimizing the virtual machine
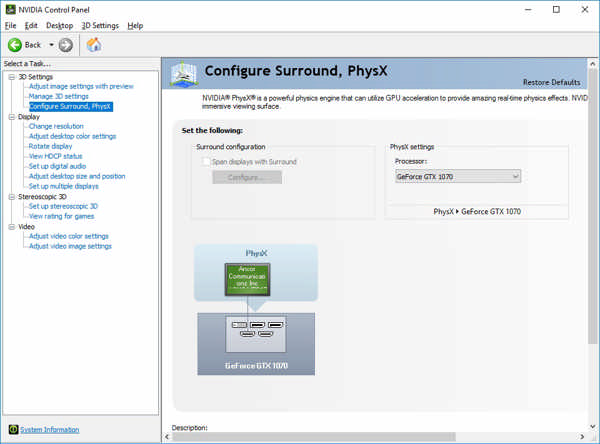
Because the CPU is emulated or not fully dedicated to the vm, we need to set up PhysX to use the GPU power and avoid performances bottle necks. Go to the NVIDIA control panel > Configure Surround, PhysX > and change the setting from whatever to the GPU you have (mine is the GTX 1070).
That's going to avoid some FPS drops while gaming!
Keyboard and Mouse seems to be unresponsive in the VM
If you see that your vm works and is trying to start the boot process, but the keyboard and mouse doesn't seem to work, you have to switch USB ports until to hit one that's being controlled by it through the vfio-pci kernel module.
Error while running the shell script
If you are unable to even see the virtual machine booting from the monitor attached to the GPU, then you need to go back to step 2 (host preparation). If you skipped the hardware requirements or are not sure if you have Intel VT-d activated on your PC, go back even further to step 1 (hardware requirements).
Then, make sure you have the right PCI addresses for the echo commands and the right file locations for the -hda and -cdrom parameters inside your shell script.
The monitor does not show anything
If the shell script seems to be running, but the monitor plugged in the GPU seems to be inactive, make sure you have the right monitor using one of the ports from the GPU and check its power source.