

For the following material, you need to know how to use a linux terminal, how to use the vi text editor (editing, saving and closing a file from terminal) and how to fresh install a Fedora linux in your PC.
Hi Folks! This post is about how to prepare your host running fedora, identifying hardware information about the graphics card and its audio device. For the motherboard I am using in my setup, the ASUS Z170P-D3, I also bought a separate USB 3.0 controller, because it only comes with 1 controller for all its USB 3.0 and 2.0 ports and once that controller is assigned to virtualization I can't use any device from fedora. Also it's more practical to have exclusive USB ports to the virtual machine, instead of assigning particular devices.

I will show you how to identify how many USB controllers your motherboard currently have.
First, you need to download the Fedora 24 workstation ISO from the official website. The spin I will be referring to is the GNOME desktop one. You can either burn a DVD with the image and boot it up on or write the image in a pendrive, using a LiveUSB application.
I highly recommend you start with a clean updated fedora 24 to reproduce this thing. If you have Oracle Virtualbox or Xen VMs installed in your fedora and try to replicate this, I believe other virtualization software might interfere and cause issues (especially when it comes to kernel modules).
I also recommend you use a separate hard drive to install and hold the VM files, preferably an SSD one for performance reasons.
After installing fedora in the hard drive and booting from it, open a terminal window and run the following command as root to update all packages and the kernel.
# dnf update
Then restart your PC. Don't forget to enable Intel VT-d from the BIOS section of your motherboard and setting the primary display to a GPU other than the one you want to use in your virtual machine. After logging in again, reopen a terminal window and escalate your permission to root.
Identifying the GPU and PCI information
Vendor IDs are codes manufactures use to identify all devices and PCI address are their location when installed on your PC.
In a terminal window, run the following command as root to list all the PCI devices from your PC:
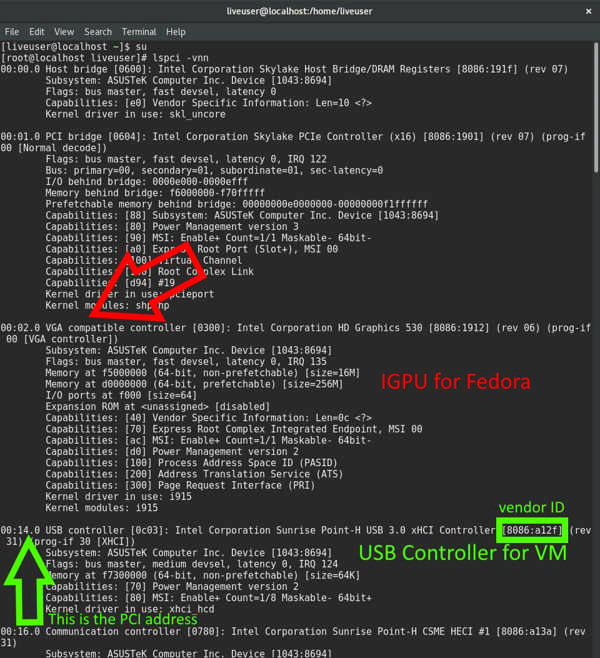
# lspci -vnn
The following output comes from my PC:

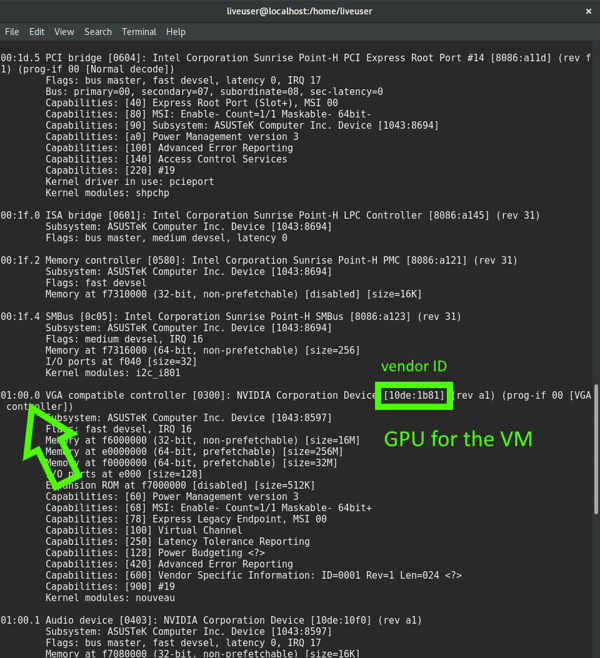
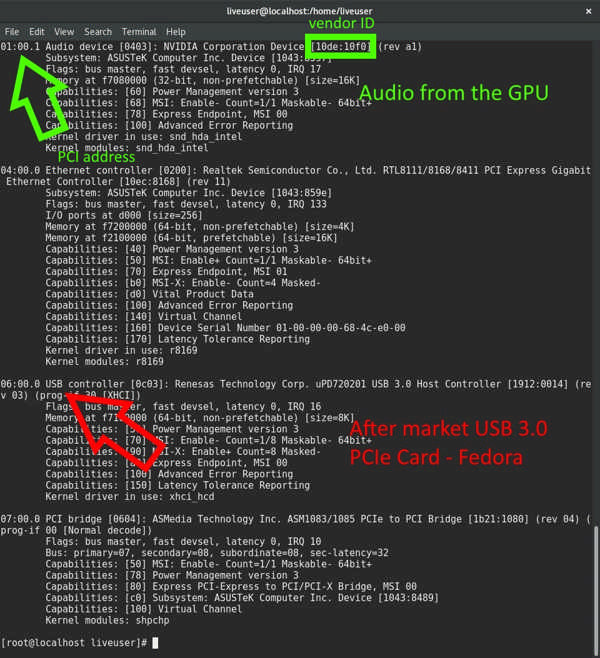
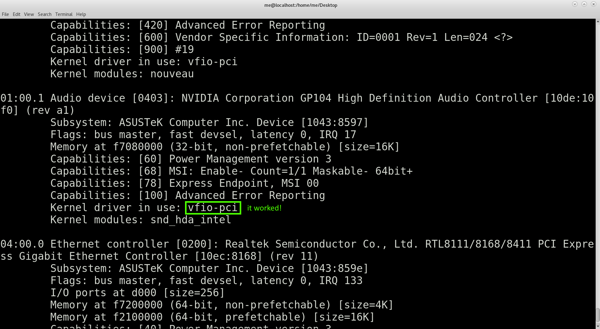
If you installed your GPU in the first PCIe 3.0 slot, you should look for the device listed in the 01:00.0 address from the lspci command output. Its audio device should follow the GPU, under the 01:00.1 address.
Notice a RENESAS USB 3.0 controller from the last picture above. That's the extra USB controller card I installed on my PC (see the first couple of pictures in this post). One way to find out which one is an onboard controller is executing the lspci command without installing any additional USB cards.
Make sure you have 2 USB controllers or you will lose access to your USB devices from fedora, since one will be dedicated to the vm, and won't be able to continue configuring your machine.
I rather assign a controller from the motherboard, because it's easier to use, more reliable and provides more features. Cheap USB 3.0 cards running and dedicated to the VM can make it crash...
If you have a different motherboard, the PCI output will vary a lot.
Write down the PCI address (pointed using arrows in the pictures above) from your GPU, its audio device and the USB controller. For an example, check the numbers from my PC:
- GPU: 01:00.0 (PCI address where you installed it in your mb)
- GPU Audio: 01:00.1 (audio device that follows the GPU)
- USB Ports: 00:14.0 (you should have the PCI address from your PC)
Write down the vendor IDs ([codes in between brackets]) from your GPU, its audio device and the USB controller. For an example, check the numbers from my PC:
- GPU: 10de:1b81 (from my GTX1070)
- GPU Audio: 10de:10f0 (from my GTX1070)
- USB Ports: 8086:a12f (you should have the vendor ID from your PC)
If you have the same Geforce GTX1070 Turbo from ASUS I do, the vendor IDs for your GPU should be the same as listed above.
We will need those values to inform fedora which devices should be set aside for the virtualization process. Keep in mind not every device is compatible with this virtualization method (you can't assign a RAID controller to a VM, for example).
Preparing the host initialization
Open a terminal window and escalate your permission to root. First we will edit the GRUB initialization parameters, adding a couple of them to enable the intel virtualization inside fedora. Execute the following command:
# vi /etc/default/grub
Add intel_iommu=on and rd.driver.pre=vfio-pci at the end of GRUB_CMDLINE_LINUX line (in between the quotes). Then save it and close vi. The file should look like this after editing:
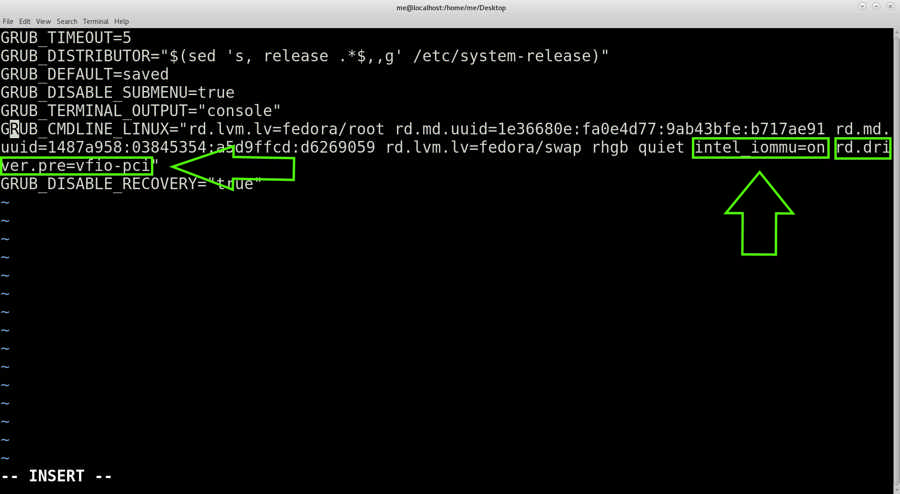
[example: edit the file on your fedora] grub (394.00 bytes)
Now, we have to update the grub.cfg configuration file to reflect the changes we did to default/grub. Run the following command:
If booting fedora with the UEFI option:
# grub2-mkconfig -o /boot/efi/EFI/fedora/grub.cfg
If you not UEFI booting at all (legacy mode):
# grub2-mkconfig -o /boot/grub2/grub.cfg
Then we will create two files: one for the vfio-pci kernel module, passing the vendor IDs we found earlier so they will be under control for virtualization, and another for loading the vfio-pci into the initramfs.
Open a terminal window and escalate your permission to root again. Next you execute the following command to create a file:
# vi /etc/modprobe.d/vfio-pci.conf
Add the following line to it, options vfio-pci ids=<gpu vendor-id>, <gpu audio vendor-id>,<USB controller vendor-id>, using the IDs you found from running the lspci command. It should look like the one I have from my configuration:
![[example] /etc/modprobe.d/vfio-pci.conf](/files/2016/gaming-on-a-vm-2-hostpreparation/modprobe.d_vfio-pci.conf.png?size=medium)
[modprobe] vfio-pci.conf (52.00 bytes)
Now, we make sure the kernel module is loaded and take precedent during the boot process. Execute the following command to create another file:
# vi /etc/dracut.conf.d/vfio-pci.conf
Add this line to it: add_drivers+="vfio vfio_iommu_type1 vfio_pci vfio_virqfd". Then save and close it.
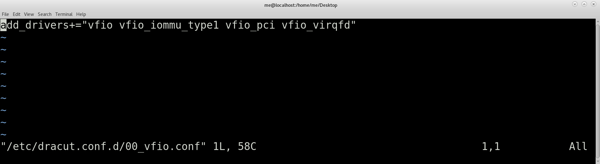
[dracut.conf.d] vfio-pci.conf (58.00 bytes)
Next thing we will do is reflect the changes from the 2 files and update the initramfs for the kernels we have installed, by executing the following command:
# dracut --regenerate-all --force
Good thing is whenever fedora updates its kernel from the official RPM, it will generate the proper initramfs for the new ones, keeping the configuration running for this virtualization method.
Restart your PC now!
Is your PC ready for this?
Ok, we need to verify whether all this preparation worked or not. Log into fedora and open a terminal window.
$ cat /proc/cmdline
You should see those 2 parameters we added to the /etc/default/grub file and later updated the grub configuration file.
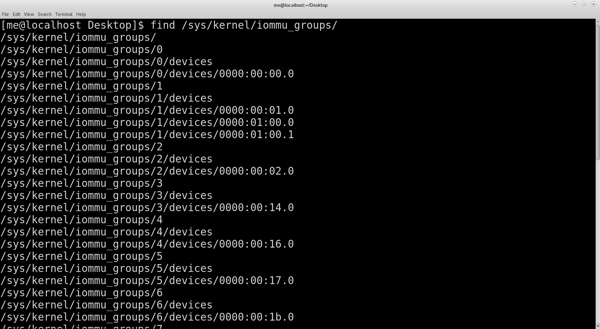
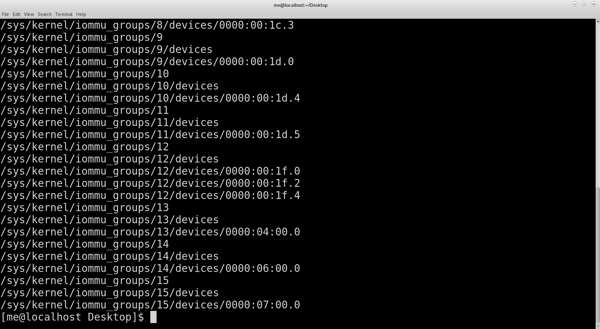
$ find /sys/kernel/iommu_groups
You should see a list of devices, including the ones we looked for when executing the lspci command. Not being able to see an output means you forgot to do something. Revisit the steps listed in the host preparation from this post.
# lspci -vnn
Last, but not least, we should expect the GPU and its audio device being controlled by the vfio-pci kernel module, as seen in the following pictures.
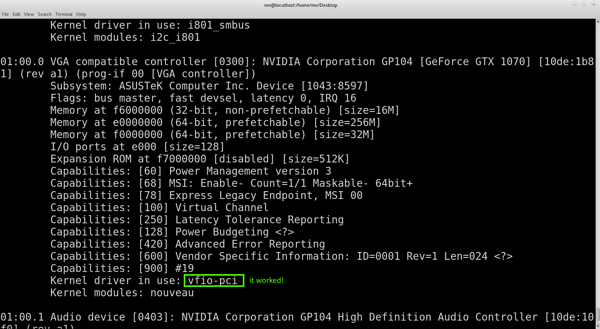
It also means the GPU can't be used by fedora, even if you configure it as the primary graphics from the BIOS.
The USB controller is an exception for now, although we did include its vendor ID into that file at modprobe.d! In the next post, preparing the virtual machine, we will create a shell script file that unbinds the USB controller and assigns to the proper module, so we can use in the virtual machine.
Why not do the same with the GPU then?
Well, this procedure needs to happen at the early stages of booting the host OS. This whole thing will fail, if X11 (window manager) ever manages to activate the GPU intended for virtualization.
If you purchased an USB 3.0 card and installed it, now it's a good time to plug in a keyboard and a mouse into its ports.